×

Welcome to Knowledge Base!

KB at your finger tips

This is one stop global knowledge base where you can learn about all the products, solutions and support features.

Categories
All
Mobile-React Native
0.36: Headless JS, the Keyboard API, & more · React Native

0.36: Headless JS, the Keyboard API, & more

· 3 min read

Today we are releasing React Native 0.36. Read on to learn more about what's new.

Headless JS​

Headless JS is a way to run tasks in JavaScript while your app is in the background. It can be used, for example, to sync fresh data, handle push notifications, or play music. It is only available on Android, for now.

To get started, define your async task in a dedicated file (e.g. SomeTaskName.js ):

module.exports = async taskData => {
// Perform your task here.
};

Next, register your task in on AppRegistry :

AppRegistry.registerHeadlessTask('SomeTaskName', () =>
require('SomeTaskName'),
);

Using Headless JS does require some native Java code to be written in order to allow you to start up the service when needed. Take a look at our new Headless JS docs to learn more!

The Keyboard API​

Working with the on-screen keyboard is now easier with Keyboard . You can now listen for native keyboard events and react to them. For example, to dismiss the active keyboard, simply call Keyboard.dismiss() :

import {Keyboard} from 'react-native';

// Hide that keyboard!
Keyboard.dismiss();

Animated Division​

Combining two animated values via addition, multiplication, and modulo are already supported by React Native. With version 0.36, combining two animated values via division is now possible. There are some cases where an animated value needs to invert another animated value for calculation. An example is inverting a scale (2x --> 0.5x):

const a = Animated.Value(1);
const b = Animated.divide(1, a);

Animated.spring(a, {
toValue: 2,
}).start();

b will then follow a 's spring animation and produce the value of 1 / a .

The basic usage is like this:

<Animated.View style={{transform: [{scale: a}]}}>
<Animated.Image style={{transform: [{scale: b}]}} />
<Animated.View>

In this example, the inner image won't get stretched at all because the parent's scaling gets cancelled out. If you'd like to learn more, check out the Animations guide.

Dark Status Bars​

A new barStyle value has been added to StatusBar : dark-content . With this addition, you can now use barStyle on both Android and iOS. The behavior will now be the following:

  • default : Use the platform default (light on iOS, dark on Android).
  • light-content : Use a light status bar with black text and icons.
  • dark-content : Use a dark status bar with white text and icons.

...and more​

The above is just a sample of what has changed in 0.36. Check out the release notes on GitHub to see the full list of new features, bug fixes, and breaking changes.

You can upgrade to 0.36 by running the following commands in a terminal:

$ npm install --save [email protected]
$ react-native upgrade
Tags:
  • announcement
Introducing Button, Faster Installs with Yarn, and a Public Roadmap · React Native

Introducing Button, Faster Installs with Yarn, and a Public Roadmap

· 3 min read

We have heard from many people that there is so much work happening with React Native, it can be tough to keep track of what's going on. To help communicate what work is in progress, we are now publishing a roadmap for React Native. At a high level, this work can be broken down into three priorities:

  • Core Libraries . Adding more functionality to the most useful components and APIs.
  • Stability . Improve the underlying infrastructure to reduce bugs and improve code quality.
  • Developer Experience . Help React Native developers move faster

If you have suggestions for features that you think would be valuable on the roadmap, check out Canny, where you can suggest new features and discuss existing proposals.

What's new in React Native​

Version 0.37 of React Native, released today, introduces a new core component to make it really easy to add a touchable Button to any app. We're also introducing support for the new Yarn package manager, which should speed up the whole process of updating your app's dependencies.

Introducing Button​

Today we're introducing a basic <Button /> component that looks great on every platform. This addresses one of the most common pieces of feedback we get: React Native is one of the only mobile development toolkits without a button ready to use out of the box.

Simple Button on Android, iOS

<Button
onPress={onPressMe}
title="Press Me"
accessibilityLabel="Learn more about this Simple Button"
/>

Experienced React Native developers know how to make a button: use TouchableOpacity for the default look on iOS, TouchableNativeFeedback for the ripple effect on Android, then apply a few styles. Custom buttons aren't particularly hard to build or install, but we aim to make React Native radically easy to learn. With the addition of a basic button into core, newcomers will be able to develop something awesome in their first day, rather than spending that time formatting a Button and learning about Touchable nuances.

Button is meant to work great and look native on every platform, so it won't support all the bells and whistles that custom buttons do. It is a great starting point, but is not meant to replace all your existing buttons. To learn more, check out the new Button documentation, complete with a runnable example!

Speed up react-native init using Yarn​

You can now use Yarn, the new package manager for JavaScript, to speed up react-native init significantly. To see the speedup please install yarn and upgrade your react-native-cli to 1.2.0:

$ npm install -g react-native-cli

You should now see “Using yarn” when setting up new apps:

Using yarn

In simple local testing react-native init finished in about 1 minute on a good network (vs around 3 minutes when using npm 3.10.8). Installing yarn is optional but highly recommended.

Thank you!​

We'd like to thank everyone who contributed to this release. The full release notes are now available on GitHub. With over two dozen bug fixes and new features, React Native just keeps getting better thanks to you.

Tags:
  • announcement
Read article
Easier Upgrades Thanks to Git · React Native

Easier Upgrades Thanks to Git

· 4 min read

Upgrading to new versions of React Native has been difficult. You might have seen something like this before:

None of those options is ideal. By overwriting the file we lose our local changes. By not overwriting we don't get the latest updates.

Today I am proud to introduce a new tool that helps solve this problem. The tool is called react-native-git-upgrade and uses Git behind the scenes to resolve conflicts automatically whenever possible.

Usage​

Requirement : Git has to be available in the PATH . Your project doesn't have to be managed by Git.

Install react-native-git-upgrade globally:

$ npm install -g react-native-git-upgrade

or, using Yarn:

$ yarn global add react-native-git-upgrade

Then, run it inside your project directory:

$ cd MyProject
$ react-native-git-upgrade 0.38.0

Note: Do not run 'npm install' to install a new version of react-native . The tool needs to be able to compare the old and new project template to work correctly. Simply run it inside your app folder as shown above, while still on the old version.

Example output:

You can also run react-native-git-upgrade with no arguments to upgrade to the latest version of React Native.

We try to preserve your changes in Android and iOS build files, so you don't need to run react-native link after an upgrade.

We have designed the implementation to be as little intrusive as possible. It is entirely based on a local Git repository created on-the-fly in a temporary directory. It won't interfere with your project repository (no matter what VCS you use: Git, SVN, Mercurial, ... or none). Your sources are restored in case of unexpected errors.

How does it work?​

The key step is generating a Git patch. The patch contains all the changes made in the React Native templates between the version your app is using and the new version.

To obtain this patch, we need to generate an app from the templates embedded in the react-native package inside your node_modules directory (these are the same templates the react-native init commands uses). Then, after the native apps have been generated from the templates in both the current version and the new version, Git is able to produce a patch that is adapted to your project (i.e. containing your app name):

[...]

diff --git a/ios/MyAwesomeApp/Info.plist b/ios/MyAwesomeApp/Info.plist
index e98ebb0..2fb6a11 100644
--- a/ios/MyAwesomeApp/Info.plist
+++ b/ios/MyAwesomeApp/Info.plist
@@ -45,7 +45,7 @@
<dict>
<key>localhost</key>
<dict>
- <key>NSTemporaryExceptionAllowsInsecureHTTPLoads</key>
+ <key>NSExceptionAllowsInsecureHTTPLoads</key>
<true/>
</dict>
</dict>
[...]

All we need now is to apply this patch to your source files. While the old react-native upgrade process would have prompted you for any small difference, Git is able to merge most of the changes automatically using its 3-way merge algorithm and eventually leave us with familiar conflict delimiters:

        13B07F951A680F5B00A75B9A /* Release */ = {
isa = XCBuildConfiguration;
buildSettings = {
ASSETCATALOG_COMPILER_APPICON_NAME = AppIcon;
<<<<<<< ours
CODE_SIGN_IDENTITY = "iPhone Developer";
FRAMEWORK_SEARCH_PATHS = (
"$(inherited)",
"$(PROJECT_DIR)/HockeySDK.embeddedframework",
"$(PROJECT_DIR)/HockeySDK-iOS/HockeySDK.embeddedframework",
);
=======
CURRENT_PROJECT_VERSION = 1;
>>>>>>> theirs
HEADER_SEARCH_PATHS = (
"$(inherited)",
/Applications/Xcode.app/Contents/Developer/Toolchains/XcodeDefault.xctoolchain/usr/include,
"$(SRCROOT)/../node_modules/react-native/React/**",
"$(SRCROOT)/../node_modules/react-native-code-push/ios/CodePush/**",
);

These conflicts are generally easy to reason about. The delimiter ours stands for "your team" whereas theirs could be seen as "the React Native team".

Why introduce a new global package?​

React Native comes with a global CLI (the react-native-cli package) which delegates commands to the local CLI embedded in the node_modules/react-native/local-cli directory.

As we mentioned above, the process has to be started from your current React Native version. If we had embedded the implementation in the local-cli, you wouldn't be able to enjoy this feature when using old versions of React Native. For example, you wouldn't be able to upgrade from 0.29.2 to 0.38.0 if this new upgrade code was only released in 0.38.0.

Upgrading based on Git is a big improvement in developer experience and it is important to make it available to everyone. By using a separate package react-native-git-upgrade installed globally you can use this new code today no matter what version of React Native your project is using.

One more reason is the recent Yeoman wipeout by Martin Konicek. We didn't want to get these Yeoman dependencies back into the react-native package to be able to evaluate the old template in order to create the patch.

Try it out and provide feedback​

As a conclusion, I would say, enjoy the feature and feel free to suggest improvements, report issues and especially send pull requests. Each environment is a bit different and each React Native project is different, and we need your feedback to make this work well for everyone.

Thank you!​

I would like to thank the awesome companies Zenika and M6 Web without whom none of this would have been possible!

Tags:
  • announcement
Read article
A Monthly Release Cadence: Releasing December and January RC · React Native

A Monthly Release Cadence: Releasing December and January RC

· 2 min read

Shortly after React Native was introduced, we started releasing every two weeks to help the community adopt new features, while keeping versions stable for production use. At Facebook we had to stabilize the codebase every two weeks for the release of our production iOS apps, so we decided to release the open source versions at the same pace. Now, many of the Facebook apps ship once per week, especially on Android. Because we ship from master weekly, we need to keep it quite stable. So the bi-weekly release cadence doesn't even benefit internal contributors anymore.

We frequently hear feedback from the community that the release rate is hard to keep up with. Tools like Expo had to skip every other release in order to manage the rapid change in version. So it seems clear that the bi-weekly releases did not serve the community well.

Now releasing monthly​

We're happy to announce the new monthly release cadence, and the December 2016 release, v0.40 , which has been stabilizing for all last month and is ready to adopt. (Just make sure to update headers in your native modules on iOS).

Although it may vary a few days to avoid weekends or handle unforeseen issues, you can now expect a given release to be available on the first day of the month, and released on the last.

Use the current month for the best support​

The January release candidate is ready to try, and you can see what's new here.

To see what changes are coming and provide better feedback to React Native contributors, always use the current month's release candidate when possible. By the time each version is released at the end of the month, the changes it contains will have been shipped in production Facebook apps for over two weeks.

You can easily upgrade your app with the new react-native-git-upgrade command:

npm install -g react-native-git-upgrade
react-native-git-upgrade 0.41.0-rc.0

We hope this simpler approach will make it easier for the community to keep track of changes in React Native, and to adopt new versions as quickly as possible!

(Thanks go to Martin Konicek for coming up with this plan and Mike Grabowski for making it happen)

Tags:
  • announcement
Read article
Using Native Driver for Animated · React Native

Using Native Driver for Animated

· 7 min read

For the past year, we've been working on improving performance of animations that use the Animated library. Animations are very important to create a beautiful user experience but can also be hard to do right. We want to make it easy for developers to create performant animations without having to worry about some of their code causing it to lag.

What is this?​

The Animated API was designed with a very important constraint in mind, it is serializable. This means we can send everything about the animation to native before it has even started and allows native code to perform the animation on the UI thread without having to go through the bridge on every frame. It is very useful because once the animation has started, the JS thread can be blocked and the animation will still run smoothly. In practice this can happen a lot because user code runs on the JS thread and React renders can also lock JS for a long time.

A bit of history...​

This project started about a year ago, when Expo built the li.st app on Android. Krzysztof Magiera was contracted to build the initial implementation on Android. It ended up working well and li.st was the first app to ship with native driven animations using Animated. A few months later, Brandon Withrow built the initial implementation on iOS. After that, Ryan Gomba and myself worked on adding missing features like support for Animated.event as well as squash bugs we found when using it in production apps. This was truly a community effort and I would like to thanks everyone that was involved as well as Expo for sponsoring a large part of the development. It is now used by Touchable components in React Native as well as for navigation animations in the newly released React Navigation library.

How does it work?​

First, let's check out how animations currently work using Animated with the JS driver. When using Animated, you declare a graph of nodes that represent the animations that you want to perform, and then use a driver to update an Animated value using a predefined curve. You may also update an Animated value by connecting it to an event of a View using Animated.event .

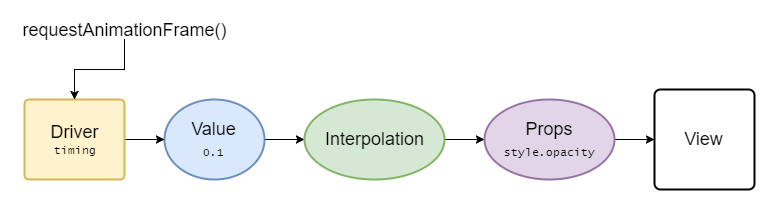
Here's a breakdown of the steps for an animation and where it happens:

  • JS: The animation driver uses requestAnimationFrame to execute on every frame and update the value it drives using the new value it calculates based on the animation curve.
  • JS: Intermediate values are calculated and passed to a props node that is attached to a View .
  • JS: The View is updated using setNativeProps .
  • JS to Native bridge.
  • Native: The UIView or android.View is updated.

As you can see, most of the work happens on the JS thread. If it is blocked the animation will skip frames. It also needs to go through the JS to Native bridge on every frame to update native views.

What the native driver does is move all of these steps to native. Since Animated produces a graph of animated nodes, it can be serialized and sent to native only once when the animation starts, eliminating the need to callback into the JS thread; the native code can take care of updating the views directly on the UI thread on every frame.

Here's an example of how we can serialize an animated value and an interpolation node (not the exact implementation, just an example).

Create the native value node, this is the value that will be animated:

NativeAnimatedModule.createNode({
id: 1,
type: 'value',
initialValue: 0,
});

Create the native interpolation node, this tells the native driver how to interpolate a value:

NativeAnimatedModule.createNode({
id: 2,
type: 'interpolation',
inputRange: [0, 10],
outputRange: [10, 0],
extrapolate: 'clamp',
});

Create the native props node, this tells the native driver which prop on the view it is attached to:

NativeAnimatedModule.createNode({
id: 3,
type: 'props',
properties: ['style.opacity'],
});

Connect nodes together:

NativeAnimatedModule.connectNodes(1, 2);
NativeAnimatedModule.connectNodes(2, 3);

Connect the props node to a view:

NativeAnimatedModule.connectToView(3, ReactNative.findNodeHandle(viewRef));

With that, the native animated module has all the info it needs to update the native views directly without having to go to JS to calculate any value.

All there is left to do is actually start the animation by specifying what type of animation curve we want and what animated value to update. Timing animations can also be simplified by calculating every frame of the animation in advance in JS to make the native implementation smaller.

NativeAnimatedModule.startAnimation({
type: 'timing',
frames: [0, 0.1, 0.2, 0.4, 0.65, ...],
animatedValueId: 1,
});

And now here's the breakdown of what happens when the animation runs:

  • Native: The native animation driver uses CADisplayLink or android.view.Choreographer to execute on every frame and update the value it drives using the new value it calculates based on the animation curve.
  • Native: Intermediate values are calculated and passed to a props node that is attached to a native view.
  • Native: The UIView or android.View is updated.

As you can see, no more JS thread and no more bridge which means faster animations! 🎉🎉

How do I use this in my app?​

For normal animations the answer is simple, just add useNativeDriver: true to the animation config when starting it.

Before:

Animated.timing(this.state.animatedValue, {
toValue: 1,
duration: 500,
}).start();

After:

Animated.timing(this.state.animatedValue, {
toValue: 1,
duration: 500,
useNativeDriver: true, // <-- Add this
}).start();

Animated values are only compatible with one driver so if you use native driver when starting an animation on a value, make sure every animation on that value also uses the native driver.

It also works with Animated.event , this is very useful if you have an animation that must follow the scroll position because without the native driver it will always run a frame behind of the gesture because of the async nature of React Native.

Before:

<ScrollView
scrollEventThrottle={16}
onScroll={Animated.event(
[{ nativeEvent: { contentOffset: { y: this.state.animatedValue } } }]
)}
>
{content}
</ScrollView>

After:

<Animated.ScrollView // <-- Use the Animated ScrollView wrapper
scrollEventThrottle={1} // <-- Use 1 here to make sure no events are ever missed
onScroll={Animated.event(
[{ nativeEvent: { contentOffset: { y: this.state.animatedValue } } }],
{ useNativeDriver: true } // <-- Add this
)}
>
{content}
</Animated.ScrollView>

Caveats​

Not everything you can do with Animated is currently supported in Native Animated. The main limitation is that you can only animate non-layout properties, things like transform and opacity will work but Flexbox and position properties won't. Another one is with Animated.event , it will only work with direct events and not bubbling events. This means it does not work with PanResponder but does work with things like ScrollView#onScroll .

Native Animated has also been part of React Native for quite a while but has never been documented because it was considered experimental. Because of that make sure you are using a recent version (0.40+) of React Native if you want to use this feature.

Resources​

For more information about animated I recommend watching this talk by Christopher Chedeau.

If you want a deep dive into animations and how offloading them to native can improve user experience there is also this talk by Krzysztof Magiera.

Tags:
  • engineering
Read article
Better List Views in React Native · React Native

Better List Views in React Native

· 6 min read

Many of you have started playing with some of our new List components already after our teaser announcement in the community group, but we are officially announcing them today! No more ListView s or DataSource s, stale rows, ignored bugs, or excessive memory consumption - with the latest React Native March 2017 release candidate ( 0.43-rc.1 ) you can pick from the new suite of components what best fits your use-case, with great perf and feature sets out of the box:

<FlatList>

This is the workhorse component for simple, performant lists. Provide an array of data and a renderItem function and you're good to go:

<FlatList
data={[{title: 'Title Text', key: 'item1'}, ...]}
renderItem={({item}) => <ListItem title={item.title} />}
/>

<SectionList>

If you want to render a set of data broken into logical sections, maybe with section headers (e.g. in an alphabetical address book), and potentially with heterogeneous data and rendering (such as a profile view with some buttons followed by a composer, then a photo grid, then a friend grid, and finally a list of stories), this is the way to go.

<SectionList
renderItem={({item}) => <ListItem title={item.title} />}
renderSectionHeader={({section}) => <H1 title={section.key} />}
sections={[ // homogeneous rendering between sections
{data: [...], key: ...},
]}
/>

<SectionList
sections={[ // heterogeneous rendering between sections
{data: [...], key: ..., renderItem: ...},
]}
/>

<VirtualizedList>

The implementation behind the scenes with a more flexible API. Especially handy if your data is not in a plain array (e.g. an immutable list).

Features​

Lists are used in many contexts, so we packed the new components full of features to handle the majority of use cases out of the box:

  • Scroll loading ( onEndReached ).
  • Pull to refresh ( onRefresh / refreshing ).
  • Configurable viewability (VPV) callbacks ( onViewableItemsChanged / viewabilityConfig ).
  • Horizontal mode ( horizontal ).
  • Intelligent item and section separators.
  • Multi-column support ( numColumns )
  • scrollToEnd , scrollToIndex , and scrollToItem
  • Better Flow typing.

Some Caveats​

  • The internal state of item subtrees is not preserved when content scrolls out of the render window. Make sure all your data is captured in the item data or external stores like Flux, Redux, or Relay.

  • These components are based on PureComponent which means that they will not re-render if props remains shallow-equal. Make sure that everything your renderItem function depends on directly is passed as a prop that is not === after updates, otherwise your UI may not update on changes. This includes the data prop and parent component state. For example:

    <FlatList
    data={this.state.data}
    renderItem={({item}) => (
    <MyItem
    item={item}
    onPress={() =>
    this.setState(oldState => ({
    selected: {
    // New instance breaks `===`
    ...oldState.selected, // copy old data
    [item.key]: !oldState.selected[item.key], // toggle
    },
    }))
    }
    selected={
    !!this.state.selected[item.key] // renderItem depends on state
    }
    />
    )}
    selected={
    // Can be any prop that doesn't collide with existing props
    this.state.selected // A change to selected should re-render FlatList
    }
    />
  • In order to constrain memory and enable smooth scrolling, content is rendered asynchronously offscreen. This means it's possible to scroll faster than the fill rate and momentarily see blank content. This is a tradeoff that can be adjusted to suit the needs of each application, and we are working on improving it behind the scenes.

  • By default, these new lists look for a key prop on each item and use that for the React key. Alternatively, you can provide a custom keyExtractor prop.

Performance​

Besides simplifying the API, the new list components also have significant performance enhancements, the main one being nearly constant memory usage for any number of rows. This is done by 'virtualizing' elements that are outside of the render window by completely unmounting them from the component hierarchy and reclaiming the JS memory from the react components, along with the native memory from the shadow tree and the UI views. This has a catch which is that internal component state will not be preserved, so make sure you track any important state outside of the components themselves, e.g. in Relay or Redux or Flux store.

Limiting the render window also reduces the amount of work that needs to be done by React and the native platform, e.g from view traversals. Even if you are rendering the last of a million elements, with these new lists there is no need to iterate through all those elements in order to render. You can even jump to the middle with scrollToIndex without excessive rendering.

We've also made some improvements with scheduling which should help with application responsiveness. Items at the edge of the render window are rendered infrequently and at a lower priority after any active gestures or animations or other interactions have completed.

Advanced Usage​

Unlike ListView , all items in the render window are re-rendered any time any props change. Often this is fine because the windowing reduces the number of items to a constant number, but if your items are on the complex side, you should make sure to follow React best practices for performance and use React.PureComponent and/or shouldComponentUpdate as appropriate within your components to limit re-renders of the recursive subtree.

If you can calculate the height of your rows without rendering them, you can improve the user experience by providing the getItemLayout prop. This makes it much smoother to scroll to specific items with e.g. scrollToIndex , and will improve the scroll indicator UI because the height of the content can be determined without rendering it.

If you have an alternative data type, like an immutable list, <VirtualizedList> is the way to go. It takes a getItem prop that lets you return the item data for any given index and has looser flow typing.

There are also a bunch of parameters you can tweak if you have an unusual use case. For example, you can use windowSize to trade off memory usage vs. user experience, maxToRenderPerBatch to adjust fill rate vs. responsiveness, onEndReachedThreshold to control when scroll loading happens, and more.

Future Work​

  • Migration of existing surfaces (ultimately deprecation of ListView ).
  • More features as we see/hear the need (let us know!).
  • Sticky section header support.
  • More performance optimizations.
  • Support functional item components with state.
Tags:
  • engineering
Read article

Still Thinking?
Give us a try!

We embrace agility in everything we do.
Our onboarding process is both simple and meaningful.
We can't wait to welcome you on AiDOOS!