Welcome to Knowledge Base!

KB at your finger tips

Book a Meeting to Avail the Services of React Native overtime

This is one stop global knowledge base where you can learn about all the products, solutions and support features.

Categories
All

React Native

Building <InputAccessoryView> For React Native · React Native

Building <InputAccessoryView> For React Native

· 6 min read

Motivation​

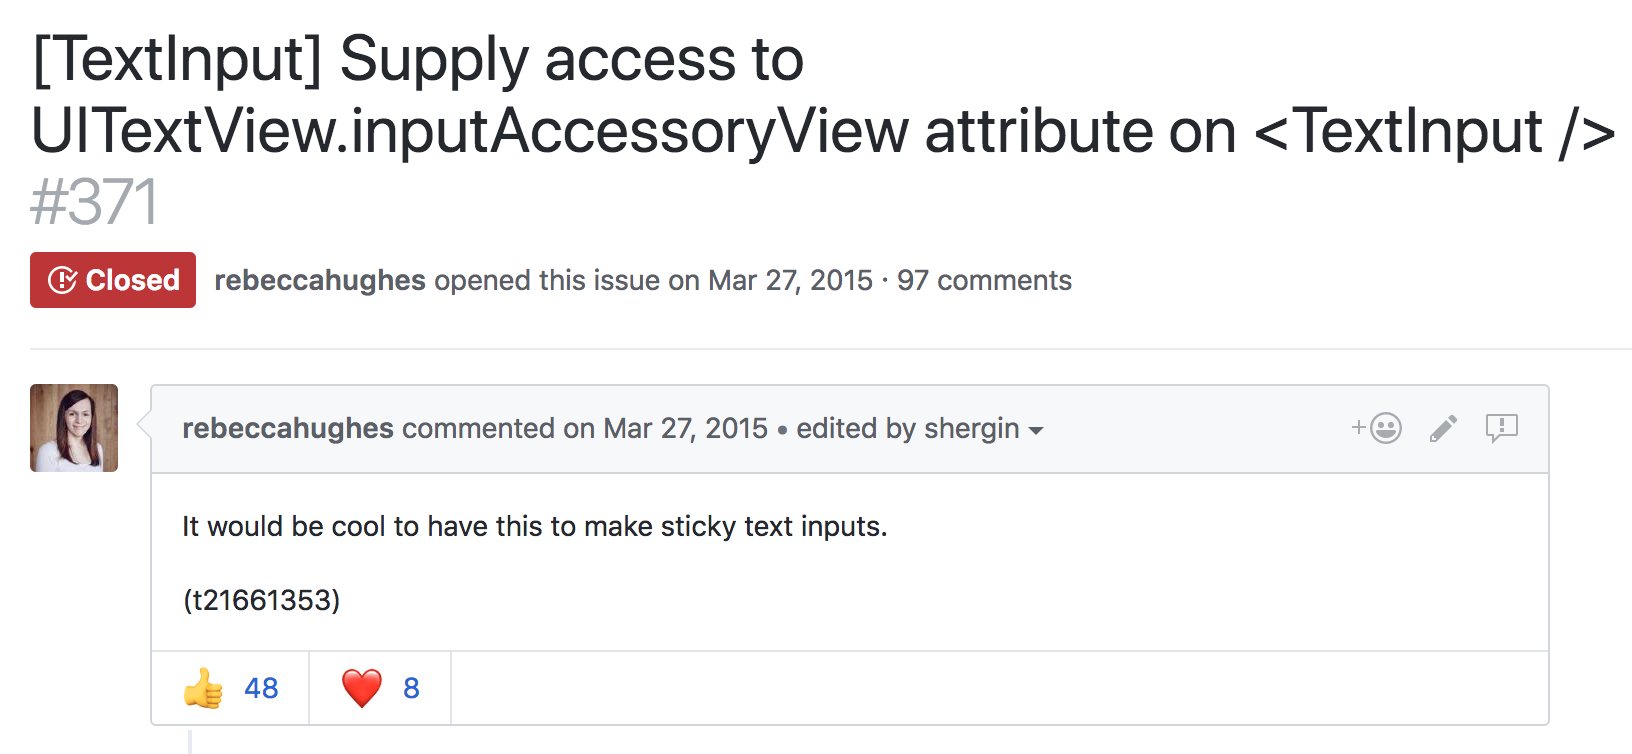
Three years ago, a GitHub issue was opened to support input accessory view from React Native.

In the ensuing years, there have been countless '+1s', various workarounds, and zero concrete changes to RN on this issue - until today. Starting with iOS, we're exposing an API for accessing the native input accessory view and we are excited to share how we built it.

Background​

What exactly is an input accessory view? Reading Apple's developer documentation, we learn that it's a custom view which can be anchored to the top of the system keyboard whenever a receiver becomes the first responder. Anything that inherits from UIResponder can redeclare the .inputAccessoryView property as read-write, and manage a custom view here. The responder infrastructure mounts the view, and keeps it in sync with the system keyboard. Gestures which dismiss the keyboard, like a drag or tap, are applied to the input accessory view at the framework level. This allows us to build content with interactive keyboard dismissal, an integral feature in top-tier messaging apps like iMessage and WhatsApp.

There are two common use cases for anchoring a view to the top of the keyboard. The first is creating a keyboard toolbar, like the Facebook composer background picker.

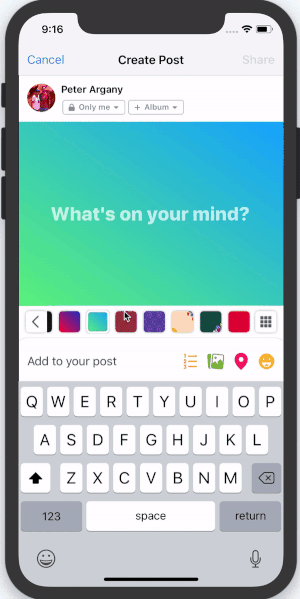
In this scenario, the keyboard is focused on a text input field, and the input accessory view is used to provide additional keyboard functionality. This functionality is contextual to the type of input field. In a mapping application it could be address suggestions, or in a text editor, it could be rich text formatting tools.


The Objective-C UIResponder who owns the <InputAccessoryView> in this scenario should be clear. The <TextInput> has become first responder, and under the hood this becomes an instance of UITextView or UITextField .

The second common scenario is sticky text inputs:

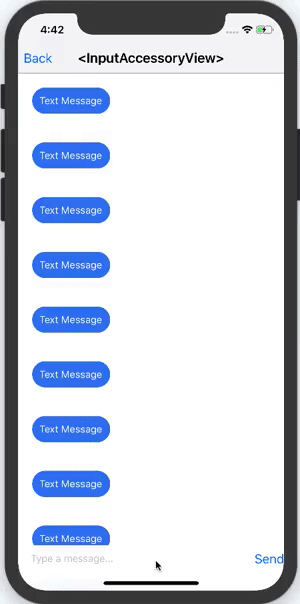
Here, the text input is actually part of the input accessory view itself. This is commonly used in messaging applications, where a message can be composed while scrolling through a thread of previous messages.


Who owns the <InputAccessoryView> in this example? Can it be the UITextView or UITextField again? The text input is inside the input accessory view, this sounds like a circular dependency. Solving this issue alone is another blog post in itself. Spoilers: the owner is a generic UIView subclass who we manually tell to becomeFirstResponder.

API Design​

We now know what an <InputAccessoryView> is, and how we want to use it. The next step is designing an API that makes sense for both use cases, and works well with existing React Native components like <TextInput> .

For keyboard toolbars, there are a few things we want to consider:

  1. We want to be able to hoist any generic React Native view hierarchy into the <InputAccessoryView> .
  2. We want this generic and detached view hierarchy to accept touches and be able to manipulate application state.
  3. We want to link an <InputAccessoryView> to a particular <TextInput> .
  4. We want to be able to share an <InputAccessoryView> across multiple text inputs, without duplicating any code.

We can achieve #1 using a concept similar to React portals. In this design, we portal React Native views to a UIView hierarchy managed by the responder infrastructure. Since React Native views render as UIViews, this is actually quite straightforward - we can just override:

- (void)insertReactSubview:(UIView *)subview atIndex:(NSInteger)atIndex

and pipe all the subviews to a new UIView hierarchy. For #2, we set up a new RCTTouchHandler for the <InputAccessoryView> . State updates are achieved by using regular event callbacks. For #3 and #4, we use the nativeID field to locate the accessory view UIView hierarchy in native code during the creation of a <TextInput> component. This function uses the .inputAccessoryView property of the underlying native text input. Doing this effectively links <InputAccessoryView> to <TextInput> in their ObjC implementations.

Supporting sticky text inputs (scenario 2) adds a few more constraints. For this design, the input accessory view has a text input as a child, so linking via nativeID is not an option. Instead, we set the .inputAccessoryView of a generic off-screen UIView to our native <InputAccessoryView> hierarchy. By manually telling this generic UIView to become first responder, the hierarchy is mounted by responder infrastructure. This concept is explained thoroughly in the aforementioned blog post.

Pitfalls​

Of course not everything was smooth sailing while building this API. Here are a few pitfalls we encountered, along with how we fixed them.

An initial idea for building this API involved listening to NSNotificationCenter for UIKeyboardWill(Show/Hide/ChangeFrame) events. This pattern is used in some open-sourced libraries, and internally in some parts of the Facebook app. Unfortunately, UIKeyboardDidChangeFrame events were not being called in time to update the <InputAccessoryView> frame on swipes. Also, changes in keyboard height are not captured by these events. This creates a class of bugs that manifest like this:

On iPhone X, text and emoji keyboard are different heights. Most applications using keyboard events to manipulate text input frames had to fix the above bug. Our solution was to commit to using the .inputAccessoryView property, which meant that the responder infrastructure handles frame updates like this.


Another tricky bug we encountered was avoiding the home pill on iPhone X. You may be thinking, “Apple developed safeAreaLayoutGuide for this very reason, this is trivial!”. We were just as naive. The first issue is that the native <InputAccessoryView> implementation has no window to anchor to until the moment it is about to appear. That's alright, we can override -(BOOL)becomeFirstResponder and enforce layout constraints there. Adhering to these constraints bumps the accessory view up, but another bug arises:

The input accessory view successfully avoids the home pill, but now content behind the unsafe area is visible. The solution lies in this radar. I wrapped the native <InputAccessoryView> hierarchy in a container which doesn't conform to the safeAreaLayoutGuide constraints. The native container covers the content in the unsafe area, while the <InputAccessoryView> stays within the safe area boundaries.


Example Usage​

Here's an example which builds a keyboard toolbar button to reset <TextInput> state.

class TextInputAccessoryViewExample extends React.Component<
{},
*,
> {
constructor(props) {
super(props);
this.state = {text: 'Placeholder Text'};
}

render() {
const inputAccessoryViewID = 'inputAccessoryView1';
return (
<View>
<TextInput
style={styles.default}
inputAccessoryViewID={inputAccessoryViewID}
onChangeText={text => this.setState({text})}
value={this.state.text}
/>
<InputAccessoryView nativeID={inputAccessoryViewID}>
<View style={{backgroundColor: 'white'}}>
<Button
onPress={() =>
this.setState({text: 'Placeholder Text'})
}
title="Reset Text"
/>
</View>
</InputAccessoryView>
</View>
);
}
}

Another example for Sticky Text Inputs can be found in the repository.

When will I be able to use this?​

The full commit for this feature implementation is here. <InputAccessoryView> will be available in the upcoming v0.55.0 release.

Happy keyboarding :)

Tags:
  • engineering

Stay Ahead in Today’s Competitive Market!
Unlock your company’s full potential with a Virtual Delivery Center (VDC). Gain specialized expertise, drive seamless operations, and scale effortlessly for long-term success.

Book a Meeting to Avail the Services of React Nativeovertime

Releasing React Native 0.59 · React Native

Releasing React Native 0.59

· 6 min read

Welcome to the 0.59 release of React Native! This is another big release with 644 commits by 88 contributors. Contributions also come in other forms, so thank you for maintaining issues, fostering communities, and teaching people about React Native. This month brings a number of highly anticipated changes, and we hope you enjoy them.

🎣 Hooks are here​

React Hooks are part of this release, which let you reuse stateful logic across components. There is a lot of buzz about hooks, but if you haven't heard, take a look at some of the wonderful resources below:

  • Introducing Hooks explains why we’re adding Hooks to React.
  • Hooks at a Glance is a fast-paced overview of the built-in Hooks.
  • Building Your Own Hooks demonstrates code reuse with custom Hooks.
  • Making Sense of React Hooks explores the new possibilities unlocked by Hooks.
  • useHooks.com showcases community-maintained Hooks recipes and demos.

Be sure to give this a try in your apps. We hope that you find the reuse as exciting as we do.

📱 Updated JSC means performance gains and 64-bit support on Android​

React Native uses JSC (JavaScriptCore) to power your application. JSC on Android was a few years old, which meant that a lot of modern JavaScript features weren't supported. Even worse, it performed poorly compared iOS's modern JSC. With this release, that all changes.

Thanks to some awesome work by @DanielZlotin, @dulmandakh, @gengjiawen, @kmagiera, and @kudo JSC has caught up with the past few years. This brings with it 64-bit support, modern JavaScript support, and big performance improvements. Kudos for also making this a maintainable process now so that we can take advantage of future WebKit improvements without so much legwork, and thank you Software Mansion and Expo for making this work possible.

💨 Faster app launches with inline requires​

We want to help people have performant React Native apps by default and are working to bring Facebook's optimizations to the community. Applications load resources as needed rather than slowing down launch. This feature is called "inline requires", as it lets Metro identify components to be lazy loaded. Apps with a deep and varied component architecture will see the most improvement.

source of the `metro.config.js` file in the 0.59 template, demonstrating where to enable `inlineRequires`

We need the community to let us know how it works before we turn it on by default. When you upgrade to 0.59, there will be a new metro.config.js file; flip the options to true and give us your feedback! Read more about inline requires in the performance docs to benchmark your app.

🚅 Lean core is underway​

React Native is a large and complex project with a complicated repository. This makes the codebase less approachable to contributors, difficult to test, and bloated as a dev dependency. Lean Core is our effort to address these issues by migrating code to separate libraries for better management. The past few releases have seen the first steps of this, but let's get serious.

You may notice that additional components are now officially deprecated. This is great news, as there are now owners for these features actively maintaining them. Heed the warning messages and migrate to the new libraries for these features, because they will be removed in a future release. Below is a table indicating the component, its status, and where you may migrate your use to.

Component Deprecated? New home
AsyncStorage 0.59 @react-native-community/react-native-async-storage
ImageStore 0.59 expo-file-system or react-native-fs
MaskedViewIOS 0.59 @react-native-community/react-native-masked-view
NetInfo 0.59 @react-native-community/react-native-netinfo
Slider 0.59 @react-native-community/react-native-slider
ViewPagerAndroid 0.59 @react-native-community/react-native-viewpager

Over the coming months, there will be many more components following this path to a leaner core. We're looking for help with this head over to the lean core umbrella to pitch in.

👩🏽‍💻 CLI improvements​

React Native's command line tools are developer's entry point to the ecosystem, but they had long-standing issues and lacked official support. The CLI tools have been moved to a new repository, and a dedicated group of maintainers have already made some exciting improvements.

Logs are formatted much better now. Commands now run nearly instantly you'll immediately notice a difference:

0.58&#39;s CLI is slow to start 0.58&#39;s CLI is nearly instantaneous

🚀 Upgrading to 0.59​

We heard your feedback regarding the React Native upgrade process and we are taking steps to improve the experience in future releases. To upgrade to 0.59, we recommend using rn-diff-purge to determine what has changed between your current React Native version and 0.59, then applying those changes manually. Once you've upgraded your project to 0.59, you will be able to use the newly improved react-native upgrade command (based on rn-diff-purge !) to upgrade to 0.60 and beyond as newer releases become available.

🔨 Breaking Changes​

Android support in 0.59 has been cleaned up following Google's latest recommendations, which may result in potential breakage of existing apps. This issue might present as a runtime crash and a message, "You need to use a Theme.AppCompat theme (or descendant) with this activity". We recommend updating your project's AndroidManifest.xml file, making sure that the android:theme value is an AppCompat theme (such as @style/Theme.AppCompat.Light.NoActionBar ).

The react-native-git-upgrade command has been removed in 0.59, in favor of the newly improved react-native upgrade command.

🤗 Thanks​

Lots of new contributors helped with enabling generation of native code from flow types and resolving Xcode warnings - these are a great way to learn how React Native works and contributing to the greater good. Thank you! Look out for similar issues in the future.

While these are the highlights that we noted, there are many others to be excited about. To see all of the updates, take a look at the changelog. 0.59 is a huge release – we can't wait for you to try it out.

We have even more improvements coming throughout the rest of the year. Stay tuned!

Ryan and the whole React Native core team

Tags:
  • announcement
  • release
Read article

Built with React Native - The Build.com app · React Native

Built with React Native - The Build.com app

· 5 min read

Build.com, headquartered in Chico, California, is one of the largest online retailers for home improvement items. The team has had a strong web-centric business for 18 years and began thinking about a mobile App in 2015. Building unique Android and iOS apps wasn’t practical due to our small team and limited native experience. Instead, we decided to take a risk on the very new React Native framework. Our initial commit was on August 12, 2015 using React Native v0.8.0! We were live in both App Stores on October 15, 2016. Over the last two years, we’ve continued to upgrade and expand the app. We are currently on React Native version 0.53.0.

You can check out the app at https://www.build.com/app.

Features​

Our app is full featured and includes everything that you’d expect from an e-commerce app: product listings, search and sorting, the ability to configure complex products, favorites, etc. We accept standard credit card payment methods as well as PayPal, and Apple Pay for our iOS users.

A few standout features you might not expect include:

  1. 3D models available for around 40 products with 90 finishes
  2. Augmented Reality (AR) to allow the user to see how lights and faucets will look in their home at 98% size accuracy. The Build.com React Native App is featured in the Apple App Store for AR Shopping! AR is now available for Android and iOS!
  3. Collaborative project management features that allow people to put together shopping lists for the different phases of their project and collaborate around selection

We’re working on many new and exciting features that will continue to improve our app experience including the next phase of Immersive Shopping with AR.

Our Development Workflow​

Build.com allows each dev to choose the tools that best suit them.

  • IDEs include Atom, IntelliJ, VS Code, Sublime, Eclipse, etc.
  • For Unit testing, developers are responsible for creating Jest unit tests for any new components and we’re working to increase the coverage of older parts of the app using jest-coverage-ratchet .
  • We use Jenkins to build out our beta and release candidates. This process works well for us but still requires significant work to create the release notes and other artifacts.
  • Integration Testing include a shared pool of testers that work across desktop, mobile and web. Our automation engineer is building out our suite of automated integration tests using Java and Appium.
  • Other parts of the workflow include a detailed eslint configuration, custom rules that enforce properties needed for testing, and pre-push hooks that block offending changes.

Libraries Used in the App​

The Build.com app relies on a number of common open source libraries including: Redux, Moment, Numeral, Enzyme and a bunch of React Native bridge modules. We also use a number of forked open source libraries; forked either because they were abandoned or because we needed custom features. A quick count shows around 115 JavaScript and native dependencies. We would like to explore tools that remove unused libraries.

We're in the process of adding static typing via TypeScript and looking into optional chaining. These features could help us with solving a couple classes of bugs that we still see:

  • Data that is the wrong type
  • Data that is undefined because an object didn’t contain what we expected

Open Source Contributions​

Since we rely so heavily on open source, our team is committed to contributing back to the community. Build.com allows the team to open source libraries that we've built and encourages us contribute back to the libraries that we use.

We’ve released and maintained a number of React Native libraries:

  • react-native-polyfill
  • react-native-simple-store
  • react-native-contact-picker

We have also contributed to a long list of libraries including: React and React Native, react-native-schemes-manager , react-native-swipeable , react-native-gallery , react-native-view-transformer , react-native-navigation .

Our Journey​

We’ve seen a lot of growth in React Native and the ecosystem in the past couple years. Early on, it seemed that every version of React Native would fix some bugs but introduce several more. For example, Remote JS Debugging was broken on Android for several months. Thankfully, things became much more stable in 2017.

One of our big recurring challenges has been with navigation libraries. For a long time, we were using Expo’s ex-nav library. It worked well for us but it was eventually deprecated. However, we were in heavy feature development at the time so taking time to change out a navigation library wasn’t feasible. That meant we had to fork the library and patch it to support React 16 and the iPhone X. Eventually, we were able to migrate to react-native-navigation and hopefully that will see continued support.

Bridge Modules​

Another big challenge has been with bridge modules. When we first started, a lot of critical bridges were missing. One of my teammates wrote react-native-contact-picker because we needed access to the Android contact picker in our app. We’ve also seen a lot of bridges that were broken by changes within React Native. For example, there was a breaking change within React Native v40 and when we upgraded our app, I had to submit PRs to fix 3 or 4 libraries that had not yet been updated.

Looking Forward​

As React Native continues to grow, our wishlist to our community include:

  • Stabilize and improve the navigation libraries
  • Maintain support for libraries in the React Native ecosystem
  • Improve the experience for adding native libraries and bridge modules to a project

Companies and individuals in the React Native community have been great about volunteering their time and effort to improve the tools that we all use. If you haven’t gotten involved in open source, I hope you’ll take a look at improving the code or documentation for some of the libraries that you use. There are a lot of articles to help you get started and it may be a lot easier than you think!

Tags:
  • showcase
Read article

Using TypeScript with React Native · React Native

Using TypeScript with React Native

· 8 min read

JavaScript! We all love it. But some of us also love types. Luckily, options exist to add stronger types to JavaScript. My favourite is TypeScript, but React Native supports Flow out of the box. Which you prefer is a matter of preference, they each have their own approach on how to add the magic of types to JavaScript. Today, we're going to look at how to use TypeScript in React Native apps.

This post uses Microsoft's TypeScript-React-Native-Starter repo as a guide.

Update : Since this blog post was written, things have gotten even easier. You can replace all the set up described in this blog post by running just one command:

npx react-native init MyAwesomeProject --template react-native-template-typescript

However, there are some limitations to Babel's TypeScript support, which the blog post above goes into in detail. The steps outlined in this post still work, and Artsy is still using react-native-typescript-transformer in production, but the fastest way to get up and running with React Native and TypeScript is using the above command. You can always switch later if you have to.

In any case, have fun! The original blog post continues below.

Prerequisites​

Because you might be developing on one of several different platforms, targeting several different types of devices, basic setup can be involved. You should first ensure that you can run a plain React Native app without TypeScript. Follow the instructions on the React Native website to get started. When you've managed to deploy to a device or emulator, you'll be ready to start a TypeScript React Native app.

You will also need Node.js, npm, and Yarn.

Initializing​

Once you've tried scaffolding out an ordinary React Native project, you'll be ready to start adding TypeScript. Let's go ahead and do that.

react-native init MyAwesomeProject
cd MyAwesomeProject

Adding TypeScript​

The next step is to add TypeScript to your project. The following commands will:

  • add TypeScript to your project
  • add React Native TypeScript Transformer to your project
  • initialize an empty TypeScript config file, which we'll configure next
  • add an empty React Native TypeScript Transformer config file, which we'll configure next
  • adds typings for React and React Native

Okay, let's go ahead and run these.

yarn add --dev typescript
yarn add --dev react-native-typescript-transformer
yarn tsc --init --pretty --jsx react
touch rn-cli.config.js
yarn add --dev @types/react @types/react-native

The tsconfig.json file contains all the settings for the TypeScript compiler. The defaults created by the command above are mostly fine, but open the file and uncomment the following line:

{
/* Search the config file for the following line and uncomment it. */
// "allowSyntheticDefaultImports": true, /* Allow default imports from modules with no default export. This does not affect code emit, just typechecking. */
}

The rn-cli.config.js contains the settings for the React Native TypeScript Transformer. Open it and add the following:

module.exports = {
getTransformModulePath() {
return require.resolve('react-native-typescript-transformer');
},
getSourceExts() {
return ['ts', 'tsx'];
},
};

Migrating to TypeScript​

Rename the generated App.js and __tests_/App.js files to App.tsx . index.js needs to use the .js extension. All new files should use the .tsx extension (or .ts if the file doesn't contain any JSX).

If you tried to run the app now, you'd get an error like object prototype may only be an object or null . This is caused by a failure to import the default export from React as well as a named export on the same line. Open App.tsx and modify the import at the top of the file:

-import React, { Component } from 'react';
+import React from 'react'
+import { Component } from 'react';

Some of this has to do with differences in how Babel and TypeScript interoperate with CommonJS modules. In the future, the two will stabilize on the same behaviour.

At this point, you should be able to run the React Native app.

Adding TypeScript Testing Infrastructure​

React Native ships with Jest, so for testing a React Native app with TypeScript, we'll want to add ts-jest to our devDependencies .

yarn add --dev ts-jest

Then, we'll open up our package.json and replace the jest field with the following:

{
"jest": {
"preset": "react-native",
"moduleFileExtensions": [
"ts",
"tsx",
"js"
],
"transform": {
"^.+\\.(js)$": "<rootDir>/node_modules/babel-jest",
"\\.(ts|tsx)$": "<rootDir>/node_modules/ts-jest/preprocessor.js"
},
"testRegex": "(/__tests__/.*|\\.(test|spec))\\.(ts|tsx|js)$",
"testPathIgnorePatterns": [
"\\.snap$",
"<rootDir>/node_modules/"
],
"cacheDirectory": ".jest/cache"
}
}

This will configure Jest to run .ts and .tsx files with ts-jest .

Installing Dependency Type Declarations​

To get the best experience in TypeScript, we want the type-checker to understand the shape and API of our dependencies. Some libraries will publish their packages with .d.ts files (type declaration/type definition files), which can describe the shape of the underlying JavaScript. For other libraries, we'll need to explicitly install the appropriate package in the @types/ npm scope.

For example, here we'll need types for Jest, React, and React Native, and React Test Renderer.

yarn add --dev @types/jest @types/react @types/react-native @types/react-test-renderer

We saved these declaration file packages to our dev dependencies because this is a React Native app that only uses these dependencies during development and not during runtime. If we were publishing a library to NPM, we might have to add some of these type dependencies as regular dependencies.

You can read more here about getting .d.ts files.

Ignoring More Files​

For your source control, you'll want to start ignoring the .jest folder. If you're using git, we can just add entries to our .gitignore file.

# Jest
#
.jest/

As a checkpoint, consider committing your files into version control.

git init
git add .gitignore # import to do this first, to ignore our files
git add .
git commit -am "Initial commit."

Adding a Component​

Let's add a component to our app. Let's go ahead and create a Hello.tsx component. It's a pedagogical component, not something that you'd actually write in an app, but something nontrivial that shows off how to use TypeScript in React Native.

Create a components directory and add the following example.

// components/Hello.tsx
import React from 'react';
import {Button, StyleSheet, Text, View} from 'react-native';

export interface Props {
name: string;
enthusiasmLevel?: number;
}

interface State {
enthusiasmLevel: number;
}

export class Hello extends React.Component<Props, State> {
constructor(props: Props) {
super(props);

if ((props.enthusiasmLevel || 0) <= 0) {
throw new Error(
'You could be a little more enthusiastic. :D',
);
}

this.state = {
enthusiasmLevel: props.enthusiasmLevel || 1,
};
}

onIncrement = () =>
this.setState({
enthusiasmLevel: this.state.enthusiasmLevel + 1,
});
onDecrement = () =>
this.setState({
enthusiasmLevel: this.state.enthusiasmLevel - 1,
});
getExclamationMarks = (numChars: number) =>
Array(numChars + 1).join('!');

render() {
return (
<View style={styles.root}>
<Text style={styles.greeting}>
Hello{' '}
{this.props.name +
this.getExclamationMarks(this.state.enthusiasmLevel)}
</Text>

<View style={styles.buttons}>
<View style={styles.button}>
<Button
title="-"
onPress={this.onDecrement}
accessibilityLabel="decrement"
color="red"
/>
</View>

<View style={styles.button}>
<Button
title="+"
onPress={this.onIncrement}
accessibilityLabel="increment"
color="blue"
/>
</View>
</View>
</View>
);
}
}

// styles
const styles = StyleSheet.create({
root: {
alignItems: 'center',
alignSelf: 'center',
},
buttons: {
flexDirection: 'row',
minHeight: 70,
alignItems: 'stretch',
alignSelf: 'center',
borderWidth: 5,
},
button: {
flex: 1,
paddingVertical: 0,
},
greeting: {
color: '#999',
fontWeight: 'bold',
},
});

Whoa! That's a lot, but let's break it down:

  • Instead of rendering HTML elements like div , span , h1 , etc., we're rendering components like View and Button . These are native components that work across different platforms.
  • Styling is specified using the StyleSheet.create function that React Native gives us. React's stylesheets allow us to control our layout using Flexbox, and style using other constructs similar to those in CSS.

Adding a Component Test​

Now that we've got a component, let's try testing it.

We already have Jest installed as a test runner. We're going to write snapshot tests for our components, let's add the required add-on for snapshot tests:

yarn add --dev react-addons-test-utils

Now let's create a __tests__ folder in the components directory and add a test for Hello.tsx :

// components/__tests__/Hello.tsx
import React from 'react';
import renderer from 'react-test-renderer';

import {Hello} from '../Hello';

it('renders correctly with defaults', () => {
const button = renderer
.create(<Hello name="World" enthusiasmLevel={1} />)
.toJSON();
expect(button).toMatchSnapshot();
});

The first time the test is run, it will create a snapshot of the rendered component and store it in the components/__tests__/__snapshots__/Hello.tsx.snap file. When you modify your component, you'll need to update the snapshots and review the update for inadvertent changes. You can read more about testing React Native components here.

Next Steps​

Check out the official React tutorial and state-management library Redux. These resources can be helpful when writing React Native apps. Additionally, you may want to look at ReactXP, a component library written entirely in TypeScript that supports both React on the web as well as React Native.

Have fun in a more type-safe React Native development environment!

Tags:
  • engineering
Read article

State of React Native 2018 · React Native

State of React Native 2018

· 5 min read

It's been a while since we last published a status update about React Native.

At Facebook, we're using React Native more than ever and for many important projects. One of our most popular products is Marketplace, one of the top-level tabs in our app which is used by 800 million people each month. Since its creation in 2015, all of Marketplace has been built with React Native, including over a hundred full-screen views throughout different parts of the app.

We're also using React Native for many new parts of the app. If you watched the F8 keynote last month, you'll recognize Blood Donations, Crisis Response, Privacy Shortcuts, and Wellness Checks – all recent features built with React Native. And projects outside the main Facebook app are using React Native too. The new Oculus Go VR headset includes a companion mobile app that is fully built with React Native, not to mention React VR powering many experiences in the headset itself.

Naturally, we also use many other technologies to build our apps. Litho and ComponentKit are two libraries we use extensively in our apps; both provide a React-like component API for building native screens. It's never been a goal for React Native to replace all other technologies – we are focused on making React Native itself better, but we love seeing other teams borrow ideas from React Native, like bringing instant reload to non-JavaScript code too.

Architecture​

When we started the React Native project in 2013, we designed it to have a single “bridge” between JavaScript and native that is asynchronous, serializable, and batched. Just as React DOM turns React state updates into imperative, mutative calls to DOM APIs like document.createElement(attrs) and .appendChild() , React Native was designed to return a single JSON message that lists mutations to perform, like [["createView", attrs], ["manageChildren", ...]] . We designed the entire system to never rely on getting a synchronous response back and to ensure everything in that list could be fully serialized to JSON and back. We did this for the flexibility it gave us: on top of this architecture, we were able to build tools like Chrome debugging, which runs all the JavaScript code asynchronously over a WebSocket connection.

Over the last 5 years, we found that these initial principles have made building some features harder. An asynchronous bridge means you can't integrate JavaScript logic directly with many native APIs expecting synchronous answers. A batched bridge that queues native calls means it's harder to have React Native apps call into functions that are implemented natively. And a serializable bridge means unnecessary copying instead of directly sharing memory between the two worlds. For apps that are entirely built in React Native, these restrictions are usually bearable. But for apps with complex integration between React Native and existing app code, they are frustrating.

We're working on a large-scale rearchitecture of React Native to make the framework more flexible and integrate better with native infrastructure in hybrid JavaScript/native apps. With this project, we'll apply what we've learned over the last 5 years and incrementally bring our architecture to a more modern one. We're rewriting many of React Native's internals, but most of the changes are under the hood: existing React Native apps will continue to work with few or no changes.

To make React Native more lightweight and fit better into existing native apps, this rearchitecture has three major internal changes. First, we are changing the threading model. Instead of each UI update needing to perform work on three different threads, it will be possible to call synchronously into JavaScript on any thread for high-priority updates while still keeping low-priority work off the main thread to maintain responsiveness. Second, we are incorporating async rendering capabilities into React Native to allow multiple rendering priorities and to simplify asynchronous data handling. Finally, we are simplifying our bridge to make it faster and more lightweight; direct calls between native and JavaScript are more efficient and will make it easier to build debugging tools like cross-language stack traces.

Once these changes are completed, closer integrations will be possible. Today, it's not possible to incorporate native navigation and gesture handling or native components like UICollectionView and RecyclerView without complex hacks. After our changes to the threading model, building features like this will be straightforward.

We'll release more details about this work later this year as it approaches completion.

Community​

Alongside the community inside Facebook, we're happy to have a thriving population of React Native users and collaborators outside Facebook. We'd like to support the React Native community more, both by serving React Native users better and by making the project easier to contribute to.

Just as our architecture changes will help React Native interoperate more cleanly with other native infrastructure, React Native should be slimmer on the JavaScript side to fit better with the JavaScript ecosystem, which includes making the VM and bundler swappable. We know the pace of breaking changes can be hard to keep up with, so we'd like to find ways to have fewer major releases. Finally, we know that some teams are looking for more thorough documentation in topics like startup optimization, where our expertise hasn't yet been written down. Expect to see some of these changes over the coming year.

If you're using React Native, you're part of our community; keep letting us know how we can make React Native better for you.

React Native is just one tool in a mobile developer's toolbox, but it's one that we strongly believe in – and we're making it better every day, with over 2500 commits in the last year from 500+ contributors.

Tags:
  • engineering
Read article

Releasing 0.56 · React Native

Releasing 0.56

· 5 min read

The long-awaited 0.56 version of React Native is now available 🎉. This blog post highlights some of the changes introduced in this new release. We also want to take the opportunity to explain what has kept us busy since March.

The breaking changes dilemma, or, "when to release?"​

The Contributor's Guide explains the integration process that all changes to React Native go through. The project has is composed by many different tools, requiring coordination and constant support to keep everything working properly. Add to this the vibrant open source community that contributes back to the project, and you will get a sense of the mind-bending scale of it all.

With React Native's impressive adoption, breaking changes must be made with great care, and the process is not as smooth as we'd like. A decision was made to skip the April and May releases to allow the core team to integrate and test a new set of breaking changes. Dedicated community communication channels were used along the way to ensure that the June 2018 ( 0.56.0 ) release is as hassle-free as possible to adopt by those who patiently waited for the stable release.

Is 0.56.0 perfect? No, as every piece of software out there: but we reached a point where the tradeoff between "waiting for more stability" versus "testing led to successful results so we can push forward" that we feel ready to release it. Moreover, we are aware of a few issues that are not solved in the final 0.56.0 release. Most developers should have no issues upgrading to 0.56.0 . For those that are blocked by the aforementioned issues, we hope to see you around in our discussions and we are looking forward to working with you on a solution to these issues.

You might consider 0.56.0 as a fundamental building block towards a more stable framework: it will take probably a week or two of widespread adoption before all the edge cases will be sanded off, but this will lead to an even better July 2018 ( 0.57.0 ) release.

We'd like to conclude this section by thanking all the 67 contributors who worked on a total of 818 commits (!) that will help make your apps even better 👏.

And now, without further ado...

The Big Changes​

Babel 7​

As you may know, the transpiler tool that allows us all to use the latest and greatest features of JavaScript, Babel, is moving to v7 soon. Since this new version brings along some important changes, we felt that now it would be a good time to upgrade, allowing Metro to leverage on its improvements.

If you find yourself in trouble with upgrading, please refer to the documentation section related to it.

Modernizing Android support​

On Android, much of the surrounding tooling has changed. We've updated to Gradle 3.5, Android SDK 26, Fresco to 1.9.0, and OkHttp to 3.10.0 and even the NDK API target to API 16. These changes should go without issue and result in faster builds. More importantly, it will help developers comply with the new Play Store requirements coming into effect next month.

Related to this, we'd like to particularly thank Dulmandakh for the many PRs submitted in order to make it possible 👏.

There are some more steps that need to be taken in this direction, and you can follow along with the future planning and discussion of updating the Android support in the dedicated issue (and a side one for the JSC).

New Node, Xcode, React, and Flow – oh my!​

Node 8 is now the standard for React Native. It was actually already being tested already, but we've put both feet forward as Node 6 entered maintenance mode. React was also updated to 16.4, which brings a ton of fixes with it.

We're dropping support for iOS 8, making iOS 9 the oldest iOS version that can be targeted. We do not foresee this being a problem, as any device that can run iOS 8, can be upgraded to iOS 9. This change allowed us to remove rarely-used code that implemented workarounds for older devices running iOS 8.

The continuous integration toolchain has been updated to use Xcode 9.4, ensuring that all iOS tests are run on the latest developer tools provided by Apple.

We have upgraded to Flow 0.75 to use the new error format that many devs appreciate. We've also created types for many more components. If you're not yet enforcing static typing in your project, please consider using Flow to identify problems as you code instead of at runtime.

And a lot of other things...​

For instance, YellowBox was replaced with a new implementation that makes debugging a lot better.

For the complete release notes, please reference the full changelog here. And remember to keep an eye on the upgrading guide to avoid issues moving to this new version.


A final note: starting this week, the React Native core team will resume holding monthly meetings. We'll make sure to keep everyone up-to-date with what's covered, and ensure to keep your feedback at hand for future meetings.

Happy coding everyone!

Lorenzo, Ryan, and the whole React Native core team

PS: as always, we'd like to remind everyone that React Native is still in 0.x versioning because of the many changes still undergoing - so remember when upgrading that yes, probably, something may still crash or be broken. Be helpful towards each other in the issues and when submitting PRs - and remember to follow the CoC enforced: there's always a human on the other side of the screen.

Tags:
  • announcement
  • release
Read article